
Last updated: June 28, 2026
Any links on this page that lead to products on Amazon are affiliate links and I earn a commission if you make a purchase. Thanks in advance – I really appreciate it!
When my granddaughter visited our racehorse barn in Folsom, Louisiana, she noticed the trainer using cross ties for the horses instead of a single lead rope like we use at home. On the drive back, she wanted to know everything about them — and whether we could set some up for her horse.
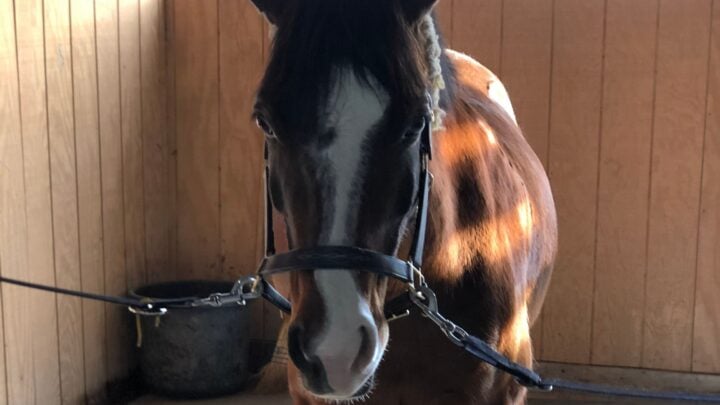
What are horse cross ties? Cross ties are two lines — rope, nylon strap, or chain — attached to opposite walls or posts, each with a quick-release snap that clips to either side of a horse’s halter. They keep the horse centered, prevent excessive movement, and allow the handler to work safely on both sides.
- Height: Tie rings should be mounted at approximately wither height — typically 5½ to 6 feet depending on your horse’s size
- Spacing: Posts or walls should be 8–12 feet apart — 10–12 feet is ideal for most horses
- Length: Pull both lines to the middle and cross them about three inches — this gives the horse room to raise and lower its head without reaching the ground
- Breakaway system required: Every cross tie setup needs a quick release and a breakaway connection — either a breakaway halter, a safety clip, or baling string at the wall ring
In this guide, you’ll learn how horse cross ties work, how to set them up correctly, which breakaway system is safest, and how to introduce a horse to them for the first time. Proper cross tie setup should always include a breakaway system — a recommendation supported by University of Minnesota Extension horse facility safety guidelines.
Table of Contents
What Are Horse Cross Ties?
Horse cross ties are two lines — rope, nylon strap, or chain — attached to opposite walls or posts, each ending in a quick-release snap clip that attaches to either side of a horse’s halter. Unlike a single lead rope tied to one point, cross ties approach the horse from both sides simultaneously, keeping it centered in the aisle or wash rack and limiting side-to-side movement without completely immobilizing the animal.
The name comes from the way the lines cross in front of the horse’s face when both are clipped — each line runs from the wall on one side to the halter ring on the opposite side of the horse’s head, forming a shallow X. This geometry is what gives cross ties their stability and makes them more secure than a single tie point for grooming, tacking, bathing, and veterinary work.
They allow you to safely secure your horse so it cannot move freely while still being able to release it quickly in an emergency. Cross ties can be used with horses at every experience level once they have been properly introduced, but they’re especially valuable for teaching young horses to stand quietly. Most horse barns install cross ties in a dedicated wash rack or cross tie area where horses can be groomed, tacked up, bathed, or examined safely.

How Cross Ties Are Used at a Racing Barn
At our Folsom training barn — and at every racetrack where we’ve stabled horses — cross ties are in continuous use throughout the day. The wash rack is the center of the operation — it has good lighting, concrete floors covered with rubber mats, and cross ties on both sides. Those three elements together are what make it possible to handle horses safely and efficiently at a busy barn.
Horseman’s Perspective: Our daily routine runs on cross ties. When grooms bring our horses out of their stalls for morning training, the first stop is the wash rack. They’re secured in cross ties, brushed out, and checked closely — legs, feet, any swelling or heat from the night before. Once they’re cleared and tacked up, they go to the track. After training they come back to the wash rack, get untacked and checked again, then go to the walking wheel to cool down. After cooling out, back to the wash rack for a bath before returning to their stall. That’s three sessions in the cross ties before noon. If there’s a vet check or farrier visit, add one more. Cross ties aren’t a convenience at a racing barn — they’re how the work gets done.
The pattern is the same at virtually every professional horse facility: cross ties centralize the horse in a controlled space, free up the handler’s hands, and keep the animal accessible from both sides. For a groom working alone, that accessibility is essential — you can’t safely examine both front legs, both eyes, or both sides of a horse that’s loose on a lead rope.
Types and Materials: Choosing the Right Cross Ties
Cross ties come in several configurations and materials. The right combination depends on your barn setup, the horses you work with, and how much adjustability you need. The table below covers both dimensions together — configuration type, material, best application, and the key breakaway consideration for each.
| Type / Material | How It Works | Best For | Breakaway Note |
|---|---|---|---|
| Standard nylon or polyester strap | Fixed-length webbing attached to wall rings with a snap at the horse end; most common setup | Barns with horses of consistent size; easy to clean in wash rack conditions; most durable everyday option | Needs a separate breakaway clip or safety loop — the strap itself won’t give |
| Adjustable nylon strap | Same as standard but with a buckle or sliding mechanism to shorten or lengthen without re-rigging | Facilities handling horses of varying height; training barns with multiple breeds | Same as standard — breakaway must be added separately; check buckle regularly for loosening |
| Rope (cotton or nylon) | Traditional braided rope from ring to snap; slight natural give | Owners who prefer to splice and adjust their own lengths; lighter weight than webbing | Cotton rope can act as a weak-link breakaway if sized correctly; nylon rope is stronger and less forgiving — add a separate breakaway |
| Bungee / elastic | Incorporates a bungee section that absorbs sudden movement rather than going fully taut | Young or reactive horses that tend to pull back; reduces the shock load on the halter | Elastic degrades with UV and heavy use — inspect the bungee section frequently; can encourage some horses to test the pressure repeatedly |
| Chain | Metal chain links from wall ring to snap; sometimes used with a rope or rubber section near the halter end | Heavy horses or situations where strap wear is chronic; most durable long-term | No stretch — all force goes directly to the halter if the horse pulls back hard; breakaway at the halter side is essential |
| Leather | Traditional strap with natural slight give; preferred in some show barns | Aesthetics matter; show facilities; horses that are already confirmed cross tie users | Leather degrades quickly if neglected or left wet; can act as a natural weak link when dry-rotted — inspect regularly |
Regardless of type or material, every cross tie setup needs the same two things: a quick-release snap at the horse end that can be operated under tension, and a deliberate breakaway connection somewhere in the system. The material choice matters far less than making sure both of those features work every time you use them.
How to Set Up Horse Cross Ties
Setting up cross ties correctly is a one-time investment that pays off every day you use them. The spacing, height, and length all affect how safely and comfortably the horse can stand — getting any one of them significantly wrong creates problems that are difficult to fix without re-rigging from scratch.
| Specification | Recommended Dimension | Why It Matters |
|---|---|---|
| Wall or post spacing | 8 feet minimum; 10–12 feet preferred | Needs enough room to work around the horse on both sides and step out of the way quickly if it startles |
| Tie ring height | At approximately wither height — typically 5½ to 6 feet depending on your horse’s size | Too low and the lines pull the horse’s head down; too high and they restrict the horse’s natural head movement for balance |
| Line length | Pull both lines to the center and cross them about 3 inches — this sets the working length | The horse must be able to raise and lower its head freely — essential for balance when a foot is picked up — but not reach the ground |
| Tie ring type | Blocker tie rings or standard heavy-duty tie rings rated for horse use | Blocker tie rings allow the rope to slide under pressure, which can reduce panic if the horse pulls back; standard rings are simpler and more common |
| Snap type | Bull snap or panic snap at the horse end; panic snap preferred | Panic snaps release under tension with one hand — critical if a horse goes down or gets a leg over the line |
If you are designing a new barn, build the cross tie area into the aisle plan from the beginning. The ideal location is a dedicated wash rack or a wide section of the main aisle with good overhead lighting, a non-slip floor surface, and clear access from both ends. Adding cross ties as an afterthought to an aisle that’s too narrow or poorly lit makes every grooming and tacking session harder than it needs to be.
Step-by-step: setting up cross ties for the first time
- Choose your location — at least 8 feet between attachment points, ideally 10–12 feet, with room to walk around the horse on both sides
- Mount tie rings at wither height on both walls or posts — drill into a stud or solid beam, not just the wall surface; the rings need to hold significant force
- Attach adjustable cross tie straps to the rings — pull both to the center and cross them 3 inches to set the length before attaching to the horse
- Add your breakaway connection before the first use — see the safety section below
- Introduce the horse to cross ties gradually if it is not experienced — clip one side first, let the horse settle, then clip the second side

Cross Tie Safety: Breakaway Systems Explained
The most important feature of any cross tie setup is the breakaway system — a deliberate weak point that fails before the horse or handler does. A horse that panics in cross ties and cannot break free will throw itself backward with enough force to seriously injure itself, break the tie rings from the wall, or go down in the aisle. A properly designed breakaway system prevents all of those outcomes by giving the horse an exit before the situation escalates.
Never cross tie a horse without a breakaway connection. A horse that panics and cannot release will pull until something breaks — and what breaks may be the wall attachment, the snap hardware, or the horse’s neck. The breakaway connection is not optional safety theater; it is the feature that makes cross ties safe to use. Every setup, every horse, every time.
There are three common breakaway approaches, each with different tradeoffs:
| Breakaway Method | Where It’s Located | What Happens When It Releases | Pros / Cons |
|---|---|---|---|
| Breakaway halter | The halter itself has a leather or synthetic breakaway crown piece | The halter releases at the crown — horse is free but the cross tie lines stay attached to the wall and hang safely | Cleanest outcome — nothing snaps back at the horse; halter must be replaced or repaired after each break; cost adds up |
| Safety clip / breakaway clip on halter | A plastic safety clip or baling twine loop between the halter ring and the cross tie snap | The clip or string breaks — horse is free; cross tie stays on wall; broken piece stays on halter ring | Preferred by many professional handlers; inexpensive and easy to replace; the broken piece stays with the halter, not flying loose toward the horse |
| Baling string or zip tie at wall ring | A loop of baling twine between the wall ring and the cross tie strap | The string breaks — cross tie strap and snap come free and fall; horse may still have strap swinging near it | Simple and cheap; the concern is that the freed strap can swing and hit the horse, potentially making the situation worse — this is why I prefer the halter-side breakaway |
| Panic snap | At the horse end of the cross tie line — replaces the standard bull snap | Handler pulls the release ring — snap opens instantly even under tension; horse is released | Requires a human to operate — not automatic; best used in addition to a breakaway, not instead of one; essential for situations where the horse goes down |
Horseman’s Perspective: My preference is the safety clip or baling string on the halter side rather than at the wall ring. The reason is simple: if the breakaway is at the wall and it releases, the cross tie strap swings free. Depending on the snap and how much tension was on the line, it can whip back toward the horse’s face. I’ve heard of horses being hit in the eye that way. If the breakaway is on the halter, the broken piece falls and stays attached to the halter ring — nothing goes flying. The horse breaks free and the wall stays intact. That’s the outcome you want.
A few additional safety practices apply regardless of which breakaway system you use: never leave a horse unattended in cross ties for extended periods, always have a quick-release snap within reach, and make sure the aisle or wash rack area has enough clearance that a startled horse can move without immediately hitting a wall. Panic in a confined space with no clearance is how accidents escalate.

Benefits of Using Cross Ties
Cross ties are the standard tethering method at professional horse facilities for straightforward reasons. They solve problems that single-point tying doesn’t address well — particularly when working alone or handling horses that move around during grooming.
Why cross ties are the standard at professional facilities:
- Handler access on both sides — a horse tied to a single point can drift left or right; cross ties keep it centered and make both flanks, both legs, and both sides of the head equally accessible
- Hands-free work — no one is holding the lead rope, which means both hands are free for grooming, tacking, wrapping legs, and veterinary procedures
- Keeps the horse’s head up — particularly useful for examining the face, eyes, and mouth, or for fitting a bridle
- Training value for young horses — cross ties teach green horses to stand still and accept restraint; the bilateral pressure is clearer than a single tie point and less likely to create a one-sided pulling habit
- Faster workflow — clip, work, unclip; no complicated knots that take time to tie and untie between horses
- Works with multiple handlers — one person can be at the head while another wraps a hind leg without the horse swinging to avoid either of them
The limitation to be honest about is that cross ties require the right infrastructure — the right spacing, the right height, a suitable floor surface, and the breakaway system in place. A poorly set up cross tie area with the wrong dimensions or no breakaway is not safer than a single tie; it may be less safe. The benefits listed above are benefits of a correctly installed setup, not of any set of clips attached to any wall.
Not every horse is immediately ready for cross ties. Horses with a history of severe pull-back panic may need additional groundwork before being introduced. In those cases, working from a single lead rope with an experienced handler is the safer starting point — the goal is to build the horse’s confidence with restraint before introducing bilateral pressure from both sides simultaneously.
Cross Ties vs Single Tie Ring: Which to Use When
Cross ties and single tie rings serve different purposes. Neither is universally better — knowing which to use in a given situation is part of handling horses safely.
| Cross Ties | Single Tie Ring | |
|---|---|---|
| Handler access | Both sides of the horse equally accessible | Horse can drift to one side; limited access to the far side |
| Best use | Grooming, tacking, bathing, vet and farrier work, anything requiring both-sides access | Quick tying while loading, short waits, trailer use, hitching posts |
| Infrastructure needed | Two anchor points at correct spacing and height; dedicated area preferred | One solid anchor point; more flexible placement |
| Release method | Quick-release snap; breakaway connection required | Quick-release knot (bowline or slip knot); breakaway halter recommended |
| Horse movement | Centered and limited; horse stays in place | More freedom to move laterally; can face any direction |
| Training value | Teaches horses to stand centered and accept bilateral restraint | Teaches horses to stand at a point; easier starting point for nervous horses |
| Typical location | Wash rack, grooming bay, barn aisle | Trailer, fence post, stall wall, hitching rail |
Horseman’s Perspective: We use both depending on where we are and what we’re doing. Cross ties at the wash rack for any real work — grooming, wrapping, vet checks. A single tie at the trailer or a fence ring for a quick stop. The key is having the right setup for the situation rather than defaulting to one method for everything. A horse that’s perfectly calm in cross ties can still get into trouble at a poorly anchored single tie point, and vice versa.
Key Takeaways: Horse Cross Ties
- Cross ties approach from both sides — they keep the horse centered and accessible from both flanks, which a single tie point cannot do
- Spacing matters: 10–12 feet is ideal — enough room to work on both sides and step clear if the horse startles; 8 feet is the minimum
- Mount rings at wither height — too low pulls the horse’s head down and compromises balance; too high restricts natural head movement
- Set length so the horse can raise and lower its head but not reach the ground — cross the two lines 3 inches in front of where the head would be to find the right length
- A breakaway connection is non-negotiable — a horse that cannot release from a panic situation will injure itself; use a safety clip or breakaway halter on every setup
- Prefer the breakaway at the halter side, not the wall — if the wall-side attachment releases, the strap can snap back toward the horse; a halter-side break stays attached and falls safely
- Never leave a horse unattended in cross ties — cross ties control movement; they don’t replace supervision
FAQs: Cross Ties for Horses
What are horse cross ties used for?
Cross ties are used to secure a horse in a fixed position while working with it — grooming, tacking up, bathing, veterinary examination, and farrier work are the most common uses. They clip to both sides of the horse’s halter simultaneously, keeping the horse centered in the aisle or wash rack and accessible from both sides without requiring a handler to hold a lead rope.
How high should horse cross ties be?
Tie rings should be mounted at approximately wither height — typically 5½ to 6 feet from the ground depending on your horse’s size. Too low and the cross tie lines pull the horse’s head down and compromise its balance when standing on three legs. Too high and the lines restrict the horse’s natural head movement.
How long should horse cross ties be?
Pull both cross tie lines to the center of the aisle and cross them about 3 inches — this gives you the correct working length for your specific setup. The horse should be able to raise and lower its head naturally but not reach the ground with its nose. You may need to adjust slightly for individual horses, particularly larger or smaller animals.
What is a breakaway cross tie?
A breakaway cross tie incorporates a weak link — usually a breakaway clip, a loop of baling twine, or a breakaway halter — that is designed to release before the horse can injure itself by pulling back hard. The breakaway can be located at the wall ring, on the cross tie strap, or on the halter itself. Halter-side breakaways are generally preferred because when they release, nothing snaps back toward the horse.
What is the difference between a panic snap and a quick-release snap?
A quick-release snap can be unclipped by rotating the gate or pulling a tab, but usually requires the line to be slack to operate smoothly. A panic snap has a separate release ring that opens the snap instantly even when the line is under full tension — it can be operated with one hand while the horse is pulling. Panic snaps are strongly recommended for cross ties because emergencies don’t wait for slack.
Can you leave a horse in cross ties unattended?
No. Cross ties restrain a horse’s movement but do not replace supervision. A horse that gets a leg over a cross tie line, lies down, or panics while unattended can injure itself before anyone can intervene. Cross ties are a working tool — they are appropriate when a handler is present and actively working with the horse, not as a substitute for a stall or paddock.
How do you introduce a young horse to cross ties?
Start by clipping only one side and letting the horse settle before clipping the second. Keep the first sessions short — a few minutes of standing quietly is enough. Have a handler at the horse’s head for the first several sessions. Use a breakaway halter or safety clip from the beginning. Avoid startling the horse during early sessions; the goal is to build positive associations with standing still in cross ties before adding the complexity of grooming or tacking.
What floor surface is best under cross ties?
A non-slip surface is essential — horses can startle and shift their weight suddenly in cross ties, and a slippery floor dramatically increases the risk of a fall. Rubber mats over concrete are the standard at professional facilities and the recommended setup for any dedicated cross tie area or wash rack. Bare concrete without mats is too slippery when wet. See the guide to concrete horse stall floors for details on setting up a proper wash rack surface.
Are cross ties safe for horses?
Yes — when set up correctly with a functioning breakaway connection, proper height and length, and an appropriate floor surface. The safety risk with cross ties comes from setups without a breakaway mechanism. A horse that panics and cannot release will throw itself backward with enough force to injure itself or pull the hardware from the wall. With a halter-side breakaway clip or breakaway halter, the horse can free itself before the situation escalates. The breakaway is what makes cross ties safe — not the cross ties themselves.
Can every horse be cross tied?
Most horses can be cross tied once properly introduced, but not every horse is ready immediately. Horses with a history of severe pull-back panic, limited training, or significant anxiety around restraint may need groundwork first. In those cases, starting with a single lead rope and a patient handler builds the horse’s confidence with restraint before introducing bilateral pressure from both sides. Once a horse stands quietly on a single tie, the transition to cross ties is usually straightforward.
About Miles Henry
Racehorse Owner & Author | 30+ Years in Thoroughbred Racing
Miles Henry (legal name: William Bradley) is a professional horseman based in Folsom, Louisiana. He holds Louisiana Racing License #67012 and has spent over three decades managing Thoroughbreds at premier tracks including Fair Grounds, Delta Downs, and Evangeline Downs.
Expertise & Hands-On Experience: Beyond the track, Miles has decades of experience in specialized equine care, covering everything from hoof health and nutrition to training protocols for Quarter Horses, Friesians, and Paints. Every guide on Horse Racing Sense is rooted in this “boots-on-the-ground” perspective.
30 of their last 90 starts
Equibase Profile.

Connect with Miles: