
Last updated: February 6, 2026
🚨 The 60-Second Triage Test (2AM Rule)
- Kit Location: Find it pitch black, no lights. <60 seconds? Pass. >60 seconds? Reorganize tonight.
- Thermometer: Normal = 99-101°F. Above 102°F or below 99°F = call vet now.
- Heart Rate: Normal = 28-40 bpm. Colic threshold = sustained 50+ bpm = emergency.
- Digital Pulse: Barely palpable = normal. Bounding/throbbing = laminitis or infection = vet now.
- Banamine: Only dose IF your vet established protocol for THIS horse. Masks surgical symptoms.
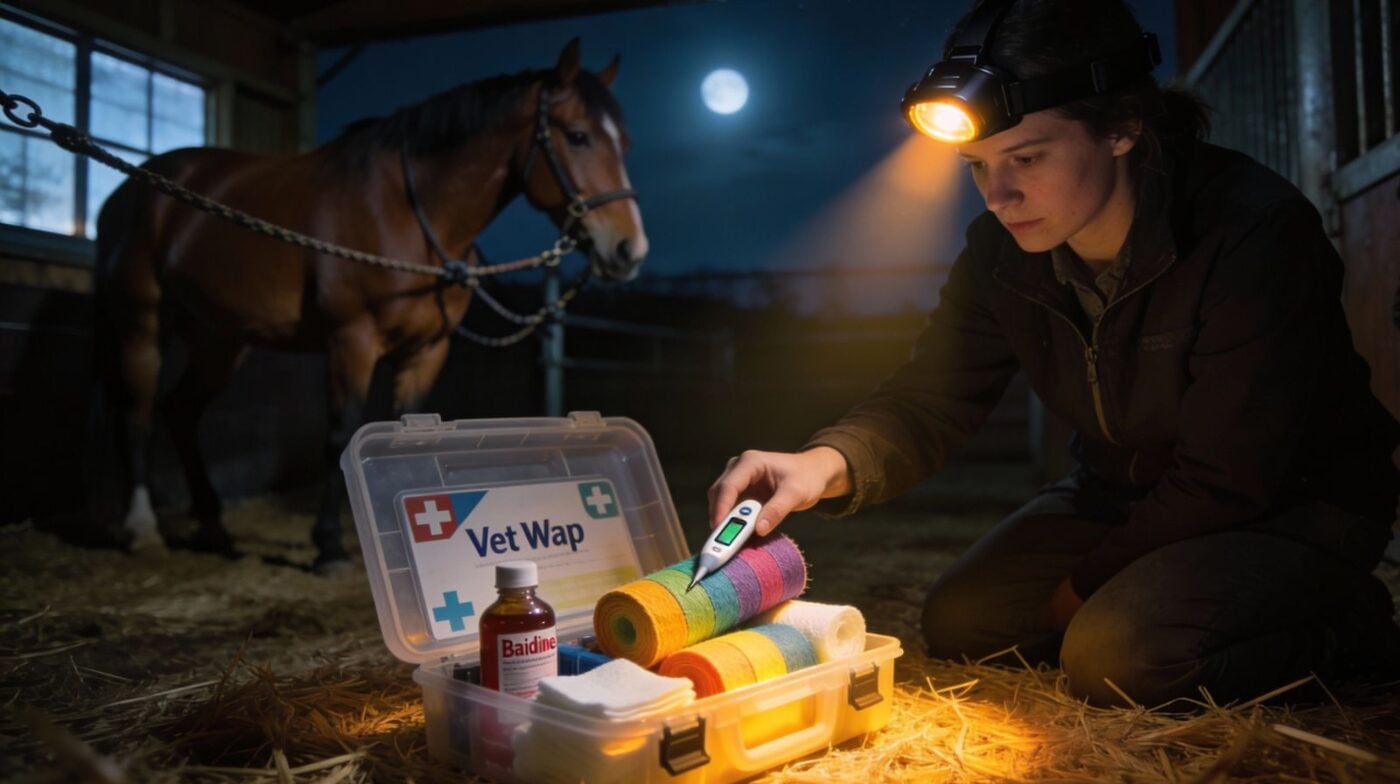
The call came at 2:47 AM. My mare, Duchess, showed textbook colic signs in the trailer, 300 miles from home—violent pawing, sweat-streaked flanks, teeth grinding. The Trailer Kit thermometer read 101.2°F, her digital pulse was bounding at the fetlock. I dosed Banamine per our vet’s standing protocol and stabilized her for the 90-minute haul to the emergency clinic. Gas colic confirmed. No $12,000 surgery.
I’m Miles Henry (Louisiana racing license #67012, 30+ years Thoroughbreds/Quarters ). I’ve managed over 20 colic episodes and two surgical cases. With vet fees up 22% and emergency calls averaging $450 before they touch your horse, preparation is the only variable you control. This is the exact 3-tier kit system I’ve refined over three decades—tested at 2 AM in trailers, at shows 6 hours from home, and in stalls when minutes mattered.
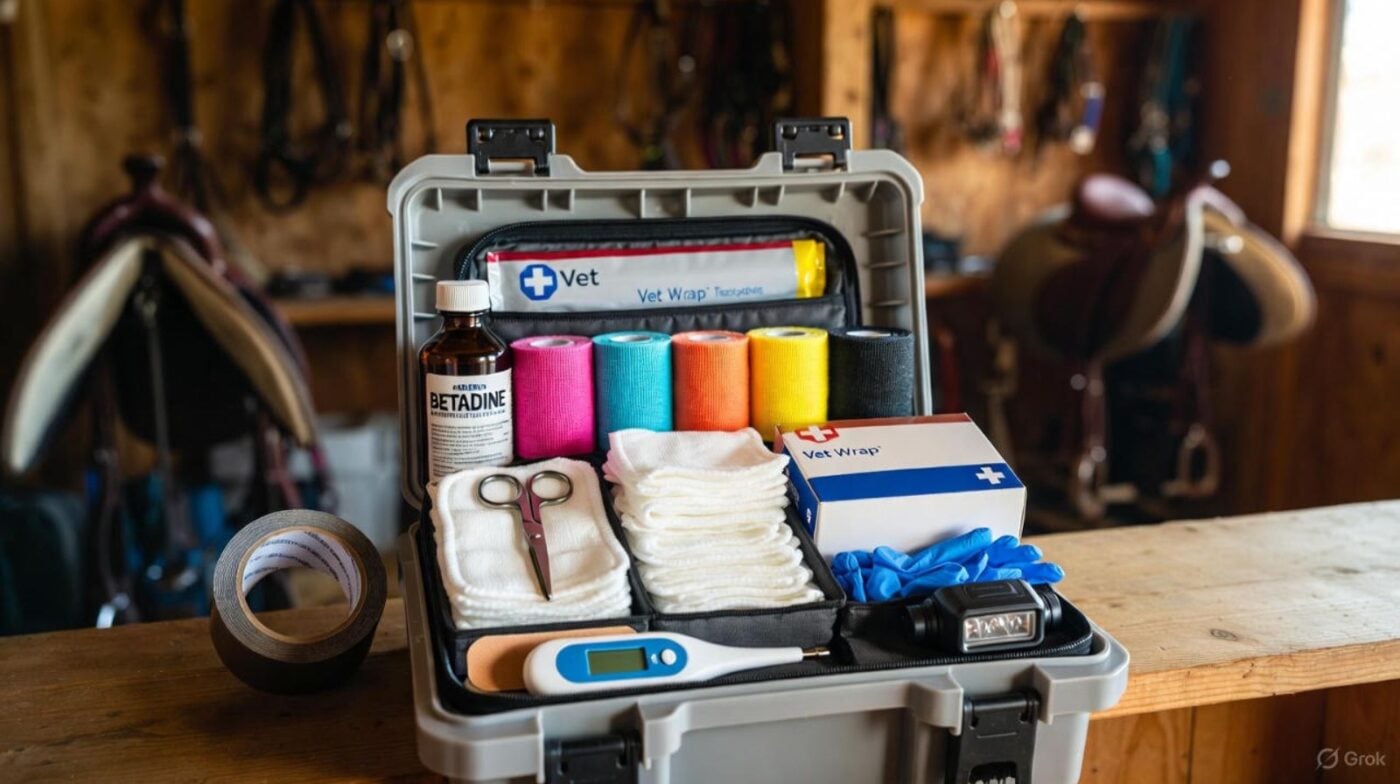
Table of Contents
Why Three Kits Beat One: The Layered Defense System
One barn kit fails the moment you pull off the driveway. Duchess’s colic hit 300 miles out. A show emergency 6 hours from home. A trail ride when your truck kit is back at the barn. The solution: three specialized kits that follow the horse. This ensures you have emergency supplies wherever your horse goes—barn, trailer, or trail.
| Barn Kit (Full Arsenal) | Trailer Kit (Road Ready) | Pocket Kit (Always On You) |
|---|---|---|
| 6x Rolls Vet Wrap 16oz Betadine 100ct Sterile Gauze Full Banamine vial + syringes 4x Standing leg wraps Sheet cotton padding | Digital Thermometer 2x Vet Wrap rolls Small LED Headlamp Duct tape roll Pre-drawn Banamine dose Spare halter + 12′ lead | Hoof pick Pocket knife/scissors Cell phone (vet #1 speed dial) Laminated vet contact card $100 cash |
| Cost: $250-$450 Handles 95% barn emergencies | Cost: $150-$300 Lives in trailer permanently | Cost: $25-$75 On your belt/pocket always |
Critical Context: AAEP data shows up to 1 in 5 horses experience colic annually. Most emergency hospitals require $4,000-$6,000 cash deposits before surgery. A $450 kit isn’t insurance—it’s triage equipment that buys you time to get professional help.
The Baseline Barn Kit: 8 Items That Handle 85% of Emergencies
This is ground zero. Every horse owner starts here. These items cover minor lacerations, low-grade colic monitoring, fever assessment, and wound stabilization until the vet arrives.
Access Requirement: You must be able to locate and open this kit in under 60 seconds, pitch black, at 2AM. Test this quarterly. If you fail, reorganize immediately.
The 8 Core Items:
- Digital Thermometer ($20-25): 8-second reads are critical for colic triage. Normal resting temp is 99-101°F. Above 102°F indicates fever; below 99°F suggests shock. Both require immediate vet contact. (Rutgers Equine Center)
- Vet Wrap ($15/roll, buy 6 = $90): 3M brand self-adhesive bandaging. No clips or pins needed. Buy assorted colors to track bandage age (red = Monday, blue = Tuesday, etc.). Critical for pressure wraps and laceration stabilization.
- Antiseptic Solution ($12-15 for 16oz): Betadine or Chlorhexidine. Do not use hydrogen peroxide on deep wounds—it damages tissue. Flush wounds thoroughly before bandaging.
- Sterile Gauze 4×4 Pads ($20/100ct): Non-stick Telfa pads go directly over wounds. Never wrap directly with Vet Wrap—you’ll rip open healing tissue when you remove it. Stock both 4×4 and 2×2 sizes.
- Bandage Scissors ($10): Blunt-tipped, angled blades. Essential for cutting through blood-matted wraps without jabbing the horse. Do not use household scissors.
- Duct Tape ($8): Gorilla brand heavy-duty. Emergency hoof boot construction, securing thick poultices, trailer repairs. Highly effective for dealing with a severe hoof abscess temporarily.
- Nitrile Gloves ($5/box of 50): Bloodborne pathogen protection. Mandatory for deep lacerations or any wound where you’ll be applying direct pressure. Change gloves between horses.
- LED Headlamp ($20): Hands-free illumination. Battery-powered, not rechargeable—you need it to work at 2AM even if you forgot to charge it. Mount it on your barn door so you always know where it is.
Regional Cost Reality: Rural South (TX/LA) runs 30-50% cheaper due to farm co-ops and local vet suppliers. Coastal CA sees freight costs double Betadine ($12→$20) and Vet Wrap ($15→$22/roll). Stock up when you’re in cheaper regions.
The Triage Decision Tree: When to Call the Vet NOW
The hardest calls happen at 2 AM when you’re sleep-deprived and second-guessing yourself. Your goal is to assess severity, stabilize the horse, and provide your vet with concrete, actionable data.
Telling your vet: “HR 52, temp 102.5°F, bounding digital pulse, no gut sounds left side” gives them something to work with.
Saying: “He looks sick” does not.
Emergency Assessment (Complete in Under 5 Minutes):
COLIC:
- Signs: Pawing, flank-gazing, rolling attempts, sweat, lip curling, no manure. This can sometimes be mistaken for horse ulcers.
- Your Action: Remove all feed immediately. Walk 10-15 minutes. Check heart rate and temp. Text vet with vitals even if not calling out yet.
- VET NOW Threshold: Heart rate sustained above 50 bpm (normal 28-40), (Source: Rutgers University) absent gut sounds on either side, pain persists 30 minutes after vet-prescribed Banamine administration.
SEVERE LACERATION:
- Signs: Arterial spurting (pulsing blood), wound gaping wider than 1 inch, deeper than ½ inch, any joint or tendon visible, facial wounds.
- Your Action: Direct pressure for 5 full minutes using gauze stacks. Do not keep lifting to check—maintain constant pressure. Flush with saline if contaminated. Apply standing wrap if on leg.
- VET NOW Threshold: Any joint or tendon exposure whatsoever, uncontrolled bleeding after 5 minutes of pressure, wounds on face or near eyes, puncture wounds near chest/abdomen. Source: CSU Equine Emergency
ACUTE LAMINITIS:
- Signs: Bounding digital pulse in all four feet, sawhorse stance (camped out front, camped under behind), heat in hooves, reluctance to move.
- Your Action: Deep bedding stall immediately (minimum 6-8 inches of shavings, sand, or rubber mats). If your vet has advised icing, follow their specific protocol. Many vets now recommend continuous icing during acute laminitis episodes. Remove ALL grain and rich hay.
- VET NOW Threshold: Digital pulse so strong it’s immediately palpable with light pressure, lameness score above 2/5, heat radiating from hoof walls detectable without touching. Source: Auburn University.
EYE INJURY:
- Signs: Squinting, tearing, corneal cloudiness, swelling, holding eye shut.
- Your Action: Dark stall immediately. Saline flush only—no ointments, no medications. Cover eye with clean towel if horse allows.
- VET NOW Threshold: ANY corneal involvement or cloudiness—vision loss can occur within 24 hours. Eyes are always emergencies. Source: CSU Equine Emergency
ESOPHAGEAL CHOKE:
- Signs: Feed material or saliva draining from nostrils, extended neck, repeated coughing/gagging, distress.
- Your Action: Remove all feed and water immediately. Lower horse’s head if possible. Do NOT attempt to manually dislodge.
- VET NOW Threshold: Unresolved after 20 minutes, any respiratory distress, or repeated choking episodes. Source: UC Davis Center for Equine Health
Three Critical Skills You Must Practice Monthly
A $450 kit is worthless without skills. These three techniques have personally saved me thousands in emergency vet bills. Practice them monthly until they’re muscle memory—panic erases training.
1. Digital Pulse Check (Laminitis/Infection Early Warning)
Location: Back of the pastern (upper fetlock), in the groove between the flexor tendon and cannon bone.
Technique:
- Run 2-3 fingertips down the back of the pastern
- Locate the groove between tendon and bone (it’s a natural channel)
- Apply light pressure—don’t dig or press hard
- Count for 30 seconds, multiply by 2 for BPM
- Check all four feet and compare—asymmetry is a red flag
Normal: Barely palpable, heart rate 28-40 bpm.
Abnormal: A normal digital pulse is faint and matches the horse’s heart rhythm; strength, not rhythm, is the red flag. A bounding, throbbing, or easily felt pulse indicates inflammation—usually laminitis, hoof abscess, or infection. Source: The University of Tennessee System

2. Emergency Standing Wrap (Laceration Stabilization)
Poor wraps cause tendon damage worse than the original injury. The rule: even pressure or nothing at all.
Technique:
- Flush wound thoroughly with saline (squeeze bottle, strong stream)
- Place non-stick Telfa pad directly over the wound
- Apply sheet cotton or quilt padding from knee to coronary band
- Wrap Vet Wrap in downward spiral with 50% overlap
- Finger-slip test: you should be able to slide one finger under the wrap at the top
Critical Mistakes That Cause Permanent Damage:
- Too tight → bandage bow (permanent tendon damage requiring months of rehab)
- No padding → pressure sores directly on flexor tendons
- Left on longer than 24 hours → cumulative compression damage
- Upward spiral → slips down within hours, becomes tourniquet
3. Banamine Administration (Vet-Scripted Protocols ONLY)
CRITICAL DISCLOSURE: BANAMINE
Never administer Banamine (Flunixin Meglumine) without your veterinarian first establishing a protocol for your specific horse. It masks surgical colic symptoms and can delay life-saving intervention. Only dose *exactly* as your vet prescribes.
When your vet prescribes Banamine for your horse, they’ll specify the dose based on weight. Veterinarians calculate doses based on weight and health history. Keep a written protocol card in your kit with your vet’s exact instructions for THIS horse.
Administration: Oral paste is safest for owners. Intramuscular injection carries risk of clostridial myositis (life-threatening infection). IV administration is vet-only.
Kit Maintenance: The Detail That Saves Lives
Dusty, expired kits create false confidence—the most dangerous mindset in an emergency. I audit every kit twice yearly: January 1 and July 1. This check is also essential for preventing dehydration in horses during hot months.
| Item | Replace Interval | Warning Signs |
|---|---|---|
| Banamine | 2 years from manufacture | Discoloration, separation, crystallization |
| Betadine | 12 months after opening | Faded brown color, sediment/precipitates |
| Vet Wrap | 3-5 years sealed | Won’t self-adhere, sticky residue |
| Gauze pads | 5 years sealed | Yellowing, brittle packaging |
| Thermometer batteries | 12 months | Dim display, slow readings |
| Scissors | Sharpen yearly | Catches on wrap, doesn’t cut cleanly |
🧪 The 2 AM Readiness Drill:
Set your alarm for 2:30 AM twice yearly. Use only a flashlight. Time yourself:
- Locate barn kit in under 60 seconds?
- Extract thermometer and Banamine in under 30 seconds?
- Vet number programmed as speed dial #1 on your phone?
If you fail any step, fix it immediately. Real emergencies give you one chance.
Frequently Asked Questions About Emergency First Aid Kits for Horses
What should be in a horse first aid kit for trailering?
A trailer kit prioritizes portability and immediate stabilization: digital thermometer, 2 rolls Vet Wrap, LED headlamp, duct tape, pre-drawn Banamine dose (if vet-approved), spare halter, 12-foot lead rope, and 2 gallons of drinking water. This kit lives in the trailer permanently so it’s always there when you need it. The key is accessibility—if Duchess’s colic had hit and I needed to dig through a tack trunk for 10 minutes, we’d have lost critical time.
What is the normal temperature for a horse?
Normal resting temperature for an adult horse is 99-101°F. Anything above 102°F generally indicates fever and requires vet contact. Anything below 99°F could indicate shock or severe illness and is an immediate emergency. Take temperature rectally for the most accurate reading—I use a digital thermometer with an 8-second read time because every second counts when you’re dealing with colic at 2AM.
How do you know if colic needs a vet immediately?
Two critical thresholds I’ve learned from managing 20+ colics: heart rate sustained above 50 beats per minute (normal is 28-40), and pain persisting more than 30 minutes after vet-prescribed Banamine administration. Also call immediately if you hear no gut sounds on either side of the abdomen, if the horse is violent or uncontrollable, or if you see repeated rolling attempts. Don’t wait and hope it resolves—early intervention is everything.
How do you check a horse’s digital pulse?
Locate the back of the pastern in the groove between the flexor tendon and the cannon bone. Apply light pressure with 2-3 fingertips—don’t dig or press hard. Normal pulse is barely palpable and matches the heart rate. A bounding, throbbing, or easily felt pulse indicates inflammation—usually laminitis, hoof abscess, or infection. Always check all four feet and compare. I practice this monthly on healthy horses so my fingers know what normal feels like.
How do you stabilize a horse’s leg wound before the vet arrives?
Apply direct pressure with sterile gauze stacks for 5 full minutes to stop bleeding—don’t keep lifting to check, maintain constant pressure. This is harder than it sounds when you’re panicking, but it works. If bleeding is controlled and the wound is on a leg, apply a standing wrap: non-stick Telfa pad over the wound, sheet cotton padding from knee to coronary band, then Vet Wrap in downward spiral with 50% overlap. Use the finger-slip test to ensure it’s not too tight.
Can you give Banamine without a vet prescription?
No. Banamine (flunixin meglumine) is a prescription medication that requires veterinary authorization. More importantly, it should never be administered without your vet first establishing a specific protocol for your individual horse, as it can mask symptoms of surgical emergencies and delay life-saving treatment. I keep a laminated protocol card in each kit with my horse’s name, weight, and exact dose. Your vet needs to see the full picture, not a pain-masked version.
Why do I need three separate first aid kits?
Because emergencies don’t only happen in the barn. Duchess’s colic hit 300 miles from home in a trailer. A barn-only kit would have been useless. The 3-tier system—Barn Kit (full arsenal), Trailer Kit (road-ready essentials), and Pocket Kit (always on you)—ensures you have critical supplies wherever your horse goes. This layered defense has saved me twice.
What’s the most common first aid kit mistake horse owners make?
Not testing their kit accessibility under realistic conditions. Then at 2AM when their horse is colicking, they can’t find the thermometer in the dark or the Vet Wrap won’t stick because it expired 3 years ago. Run the 2AM Readiness Drill twice yearly—set your alarm for 2:30AM, use only a flashlight, and time yourself locating and opening the kit in under 60 seconds. If you fail, reorganize immediately.
How often should you replace first aid kit items?
Audit your entire kit every six months—I do January 1 and July 1. Replace Banamine and medications at their 2-year expiration date, replace opened Betadine at 12 months, check thermometer batteries yearly. Replace Vet Wrap if it won’t self-adhere anymore. I’ve caught expired Banamine three times doing these checks. An expired kit gives you false confidence, which is more dangerous than having no kit at all.
How much does a complete barn first aid kit cost in 2025?
A complete barn kit ranges from $250-$450 depending on your region and brand choices. Rural South (Texas/Louisiana) runs 30-50% cheaper due to farm co-ops—I stock up on Vet Wrap there for $60-90 per 6-roll pack. Coastal California sees the same supplies hit $90-132 due to freight costs. The Trailer Kit runs $150-300, and the Pocket Kit is $25-75. Yes, it’s an investment, but it’s cheaper than a single emergency vet call, and infinitely cheaper than a $12,000 colic surgery you might have prevented with early intervention.

Final Word: Preparation Buys Time—Time Saves Lives
Colic doesn’t send a text. Lacerations don’t wait for sunrise. In thirty years managing horses—20+ colics, two surgeries, countless 2 AM calls—the only variable I’ve ever controlled is preparation.
A $450 barn kit, a $250 trailer kit, and a $75 pocket kit aren’t expenses. They’re the difference between stabilizing your horse and watching helplessly while the vet races 90 minutes to you. They’re the reason Duchess walked off that trailer instead of heading to surgery.
Audit your kits this weekend. Run the 2 AM readiness drill. Build that $5K emergency fund. Your horse’s life—and your bank account—will thank you.
📚 Resources and Source Verification
This guide is based on decades of field experience and incorporates established emergency protocols from leading equine veterinary institutions. Direct sources referenced within this article are listed below:
All claims backed by leading veterinary institutions (click links for full studies).
- AAEP & UC Davis: Recurrent Colic (AAEP Data) | Esophageal Obstruction/Choke (UC Davis Center for Equine Health)
- Vital Signs & Triage: Measuring Temperature, Pulse, & Respiration (Rutgers Equine Center) | How To Take Horse Vital Signs (The University of Tennessee System) | Understanding Vital Life Signs in Horses (Texas A&M) | Colic Thresholds (Rutgers University)
- Emergency & Laminitis: Equine Emergency Guidelines (CSU Equine Emergency) | Acute Laminitis & Assessment (Auburn University)
- Wounds & Colic Management: Horse Owner’s Guide to Colic (University of Florida Extension) | Wound Care and First Aid (University of Illinois Vet Med)
Related Reading:
Real Annual Cost to Own a Horse | Colic Signs & Emergency Response | Trailer Safety & Emergency Prep | Treating Horse Wounds
Safety Disclaimer: This guide provides owner-level first aid information only and does not replace veterinary diagnosis, treatment, or individualized medication protocols. Always consult your veterinarian before administering any medications or implementing emergency protocols. When in doubt, call your vet—early intervention saves lives and money.
About Miles Henry
Racehorse Owner & Author | 30+ Years in Thoroughbred Racing
Miles Henry (legal name: William Bradley) is a professional horseman based in Folsom, Louisiana. He holds Louisiana Racing License #67012 and has spent over three decades managing Thoroughbreds at premier tracks including Fair Grounds, Delta Downs, and Evangeline Downs.
Expertise & Hands-On Experience: Beyond the track, Miles has decades of experience in specialized equine care, covering everything from hoof health and nutrition to training protocols for Quarter Horses, Friesians, and Paints. Every guide on Horse Racing Sense is rooted in this “boots-on-the-ground” perspective.
30 of their last 90 starts
Equibase Profile.
Connect with Miles: