Last updated: March 19, 2026
⚠️ Quick Safety Note: Sudden hay changes, dusty flakes, or overly rich forage can trigger colic or laminitis—especially in easy keepers and metabolic horses. Always transition hay gradually and inspect every batch before it hits the feeder.
Not all hay is created equal—and choosing the wrong type can lead to weight gain, colic, or even laminitis. After managing Thoroughbreds in Louisiana for over 30 years, I’ve learned that picking hay isn’t just about what’s available or affordable—it’s about matching the right forage to each horse’s metabolism, workload, and health status.
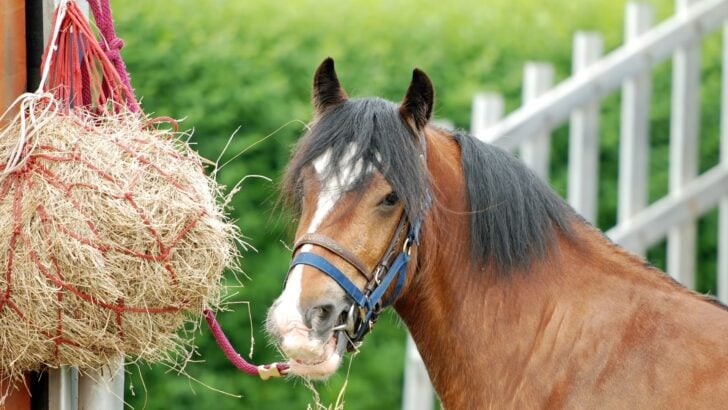
The best way to evaluate hay is simple: break open a bale. Good hay smells fresh and sweet, feels soft and pliable, and shows no signs of dust or mold. For the most accurate picture, send a sample for lab analysis to confirm nutrient levels match your horse’s needs.
Horses consume 1.5–2% of their body weight in forage each day—that’s 15–20 pounds for an average 1,000-pound horse—so hay quality affects health more than almost any other feed choice. This guide walks horse owners through five practical steps to evaluate hay quality, understand cutting differences, and match hay type to a horse’s workload, health, and metabolic risk.
For a deeper dive into hay nutrition and long-term feeding strategies, see: Best Hay for Horses: A Comprehensive Guide.

Table of Contents
Why Hay Selection Matters
Hay isn’t filler—it’s the foundation of your horse’s diet, providing 50–100% of daily fiber needs depending on pasture access. Poor hay choices show up fast: digestive upset from moldy hay triggers colic and respiratory issues, while too-rich hay can spark laminitis in metabolic horses.
Hay Basics: Types and Nutritional Profiles
Most horses thrive on 1.5–2% of their body weight in forage daily (15–20 lbs for a 1,000-lb horse). The key is matching hay type and quality to your horse’s age, workload, and health status—whether that’s a growing yearling, a senior with dental issues, or an easy keeper prone to laminitis.
The Two Main Types of Hay for Horses
Horse hay falls into two broad categories: legume hay and grass hay. Each has distinct nutritional profiles that make them better suited to certain horses.
Legume Hay (Alfalfa, Clover)
Higher in protein (14–20%), calcium, and calories. Best for:
- Growing foals and yearlings
- Pregnant or lactating mares
- Performance horses in heavy work
- Horses needing weight gain
Grass Hay (Timothy, Orchardgrass, Bermuda, Teff)
Lower in protein (8–12%) and calories, higher in fiber. Ideal for:
- Mature, idle, or lightly worked horses
- Easy keepers and overweight horses
- Horses with insulin resistance or laminitis risk
- Most adult pleasure horses
In Louisiana, I’ve had good results with Alicia Bermuda—a variety known for its finer stems and higher leaf-to-stem ratio compared to common Coastal or Jiggs Bermuda. This makes it more palatable and digestible for horses who might waste coarser Bermuda varieties.
Other options like oat hay or mixed grass-legume blends exist, but pure grass or alfalfa remains the gold standard for most owners. Always prioritize quality over type—dusty, moldy, or stemmy hay is never a good choice, no matter the variety.
⚠️ QUICK SAFETY NOTE
If your horse shows signs of colic (pawing, looking at the flank, or rolling) or sudden reluctance to move after a hay change, contact your veterinarian immediately.
Digestive upsets and laminitis are life-threatening emergencies that require prompt professional intervention to prevent permanent damage.

Which Cutting of Hay Is Best for Horses?
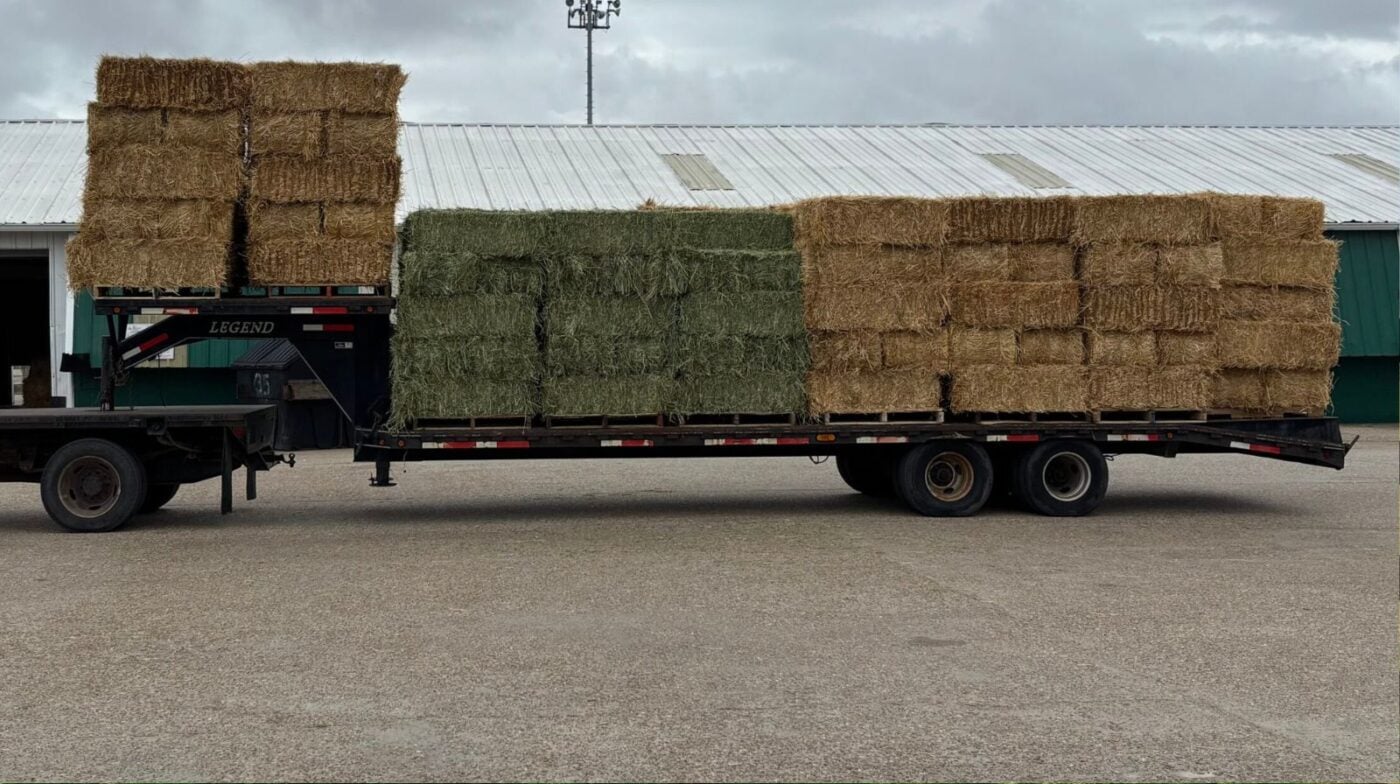
Hay fields are typically harvested 1–3 times per growing season, depending on climate, rainfall, and location. In cooler northern regions, two cuttings are common; warmer southern areas may get three or even four.
The second cutting is often a good balance for many horses. It usually has:
- Finer stems and more leaf (where the nutrients are concentrated)
- Higher protein and energy levels
- Greener color and sweeter smell
- Fewer weeds and seed heads
First cutting tends to be coarser with thicker stems, more weeds, and lower digestibility—but it’s often higher in fiber, making it suitable for easy keepers or horses prone to laminitis.
Third (and later) cuttings are usually the finest and leafiest, with the highest nutrient density—ideal for performance horses, growing youngstock, or hard keepers. However, they can be too rich for overweight or insulin-resistant horses and may be more expensive or harder to find.
💡 Pro Tip: There’s no universal “best” cutting—it depends on your horse’s needs. Always judge hay quality by leaf-to-stem ratio, color, smell, and lack of dust/mold—not just the cutting number. A poor-quality second cut can be worse than excellent first-cut hay.
Tip #1: Master the Hands-On Inspection (Before You Buy)
Never buy hay sight unseen or based on photos alone. Here’s my five-minute field inspection that’s caught countless bad loads over three decades:
The Smell Test (Most Important)
Open a bale and breathe deep. Good hay smells sweet and grassy (like fresh-cut lawn), clean with no sharp odors—almost like dried tea.
Reject immediately if it smells:
- Musty or moldy (respiratory danger)
- Fermented or alcoholic (heat-damaged)
- Dusty enough to make you cough
I once bought 200 bales that looked perfect but smelled slightly “off.” Within two days, three horses were coughing. The supplier admitted he’d baled in high humidity. That $1,200 mistake taught me to trust my nose over my eyes.
The Visual Check
Look for:
- Bright green color (indicates proper curing and vitamin retention)
- Leafy texture—leaves contain more digestible nutrients than stems and are more protein-rich, so hay with a high leaf-to-stem ratio generally indicates greater nutritional value.
- Uniform bale density (no loose or overly tight sections)
- Minimal seed heads (shows timely cutting)
Red flags:
- Brown or yellow hay (nutrient loss from sun bleach or over-maturity)
- White/grey patches (mold growth)
- Excessive stems with few leaves (low nutritional value)
- Weeds, thistles, or trash mixed in
The Touch Test
Grab a handful and assess:
- Texture: Should be soft and pliable, not brittle or sharp
- Moisture: Feels dry but not crumbly
- Temperature: Cool to touch—heat indicates dangerous fermentation
- Dust: Minimal when shaken vigorously
The shake test: Hold hay over a dark surface and shake hard. A small amount of field dust is normal. A visible cloud that lingers means mold spores—reject it.
Check multiple bales: Quality varies within the same load. Always inspect 3–5 bales from different stack locations—top, middle, and bottom layers, plus edge bales vs. interior bales. Suppliers hate when I do this, but it’s caught partial-load issues more times than I can count. If you wouldn’t breathe it comfortably yourself, don’t feed it to your horse.
Below is a helpful YouTube video that demonstrates how to evaluate hay for your horses:

Tip #2: Understand Hay Cuttings (And Why They Matter)
The “cutting” refers to which harvest produced the hay. Most regions get 2–3 cuttings per growing season, and each has distinct characteristics.
First Cutting
Timing: Early summer
Best for: Easy keepers (provides bulk without excess calories), horses prone to laminitis (lower sugar when tested), cost-conscious feeding with healthy, idle horses
Characteristics: Coarser stems, higher fiber, often contains more weeds, lower digestibility, usually the cheapest per ton
My experience: First-cut Timothy works great for my retired show horses. They stay satisfied without gaining weight, and I save $3–4 per bale compared to second cut.
Second Cutting
Timing: Mid to late summer
Best for: Most adult horses in regular work, balanced nutrition without excess richness, broad versatility across horse types
Characteristics: Leafier with finer stems, higher protein and energy, greener color, fewer weeds, better leaf-to-stem ratio, most balanced nutrition
Why it’s popular: Second cutting hits the sweet spot—nutritious enough for working horses but not so rich it causes problems. It’s my go-to for horses in moderate training.
Third Cutting (When Available)
Timing: Late summer/early fall
Best for: Performance horses in heavy work, growing youngstock, hard keepers needing weight gain, lactating mares.
I learned the hard way that what works for one horse doesn’t work for all. Feeding my easy keeper the same second-cut timothy as my performance horses led to a 40-pound gain in just three weeks—and early laminitis signs. Switching to coarser first-cut hay brought his weight back down without the slow feeder battles.
Characteristics: Very soft and leafy, highest protein and energy, minimal stems, often most expensive, limited availability in some regions
Caution: Too rich for many horses, potentially causing loose manure or excess energy; I mix it 50/50 with second-cut hay for horses coming back from an injury or extended break from training.
⚠️ The Truth About Cuttings: Maturity at harvest matters more than cutting number. Late-cut first cutting can be stemmy garbage, while early-cut third cutting might be nearly as coarse as good second cutting. Focus on leaf-to-stem ratio, plant maturity, color, and smell over cutting number alone.
Tip #3: Match Hay to Your Horse’s Needs
The “best” hay depends entirely on who’s eating it. Here’s how I match hay type to common scenarios:
For Easy Keepers (Prone to Weight Gain)
Hay choice: Mature grass hay (first or second cut), late-cut timothy or bermuda, low-NSC tested hay if metabolic issues present
Feeding strategy: Use slow feeders to extend eating time, weigh portions—never free-choice, avoid alfalfa completely, consider grazing muzzle for turnout
For Hard Keepers (Struggle to Maintain Weight)
Hay choice: Legume hay or grass-legume mix, second or third-cut grass hay, alfalfa pellets as a supplement.
Feeding strategy: Free-choice hay 24/7, add alfalfa at 20–30% of total forage, feed smaller meals more frequently, check teeth—dental issues cause hay waste
For seniors or picky eaters, using a hay net for your horse can make feeding safer and slower, protecting their top line.
For Performance Horses
Hay choice: Second-cut timothy or orchardgrass, grass hay with 20–30% alfalfa mixed in, tested for 10–12% protein minimum.
My approach with racehorses: I feed 60% grass, 40% alfalfa during training. Straight alfalfa can over-energize some horses and waste protein; the 60/40 mix supports muscle without excess energy. Learn more about feeding racehorses.
For Senior Horses
Hay choice: Soft, leafy second or third-cut grass hay, soaked hay cubes (easier to chew), avoid stemmy first-cut (hard to chew, drops out of mouth).
Watch for “quidding”: Dropped wads of partially chewed hay mean dental problems or hay too coarse. Time for a vet check and softer forage. See our guide on feeding senior horses.
- Stick to the Basics: Start with Timothy or Alfalfa/Timothy mixes for a safe baseline.
- Gut Health: Provide free-choice forage whenever possible to maintain consistent digestive movement.
- Consult the Pro: Ask your vet for NSC guidance if your horse shows signs of insulin sensitivity.
- Safety First: Check moisture and mold content in the center of the bale before purchasing.
- Metabolic Management: Strictly target NSC for IR (Insulin Resistant) horses to prevent laminitic episodes.
- Strategic Blending: Adapt your hay “portfolio” to the workload—Higher protein for training; Teff for rest.
- Data Tracking: Log weight, condition, and intake in a spreadsheet to catch metabolic shifts early.
- Batch Testing: Use a core sample lab test for every major load of 50+ bales to verify consistency.
For Insulin-Resistant or Metabolic Horses
Hay choice: Tested low-NSC grass hay (<10% ESC + starch), Teff hay (naturally low sugar), mature, stemmy grass hay, soaked hay (30–60 minutes reduces sugars by 30%). Equine hay selection guidelines also link protein and energy levels to performance and maintenance needs.
Critical: Visual inspection can’t reveal sugar content. Always test hay or soak as precaution. For comprehensive guidance on managing these horses, see our detailed article: Best Hay for Horses Guide.

Tip #4: Know When to Test Hay (And When to Skip It)
Hay testing costs $30–60 per sample, but can prevent thousands in vet bills. Here’s when it’s worth the investment:
Always Test For:
- Metabolic horses (IR, EMS, Cushing’s): Need exact NSC levels
- Performance horses: Verify protein matches training demands
- New suppliers: First-time hay source? Test before bulk purchase
- Bulk winter buys: You’re committed for months—make sure it’s right
- Unexplained issues: Horse losing weight, acting sluggish, or showing behavioral changes
You Can Skip Testing If:
- Healthy pleasure horses on trusted local hay
- Visual/smell inspection is excellent
- Horses are thriving (good weight, shiny coat, normal manure)
- Same supplier/field you’ve used successfully for years
What to Test For (Equine-Specific Panel):
- Moisture: Should be 10–15% (higher = mold risk)
- Crude Protein: Match to horse’s needs (8–12% for maintenance, 12–16% for work)
- ADF (Acid Detergent Fiber): Lower = more digestible
- NDF (Neutral Detergent Fiber): Affects intake (high NDF = horses eat less)
- ESC + Starch (NSC): Critical for IR horses (target <10–12%)
- Calcium & Phosphorus: Check ratio (ideal 2:1)
The hay test on my most recent timothy load revealed 11% protein—higher than I expected for “average” second cut. That data let me reduce grain supplementation and save money while maintaining body condition. Here is an article from the University of Minnesota that helps decipher hay test results.
How to sample: Use a hay probe or core sampler (borrow from extension office), sample 10–15 bales randomly from the load, mix cores together in a clean bag, send to lab like Equi-Analytical or your state extension service. Results typically arrive in 7–10 days.
Tip #5: Master Proper Hay Storage
You can buy perfect hay and ruin it with poor storage. Here’s how to protect your investment:
Storage Location
Ideal setup: Covered barn or three-sided shed, elevated on pallets (12+ inches off ground), good air circulation (not sealed tight), protected from rain and ground moisture
Avoid: Direct ground contact (wicks moisture → mold), sealed buildings with no ventilation (condensation risk), low-lying areas where water collects
Stacking Best Practices
- Elevate: Pallets or railroad ties under entire stack
- Airflow: Leave 6-inch gaps between stack and walls
- Curing time: Let new hay “cure” 4–6 weeks before feeding (allows fermentation to complete)
- Temperature checks: Monitor new hay stacks for heat (>120°F requires immediate spreading/ventilation)
Protection from Elements
Rain is hay’s enemy: Top-cover with breathable tarp (not plastic—traps moisture), angle tarps to shed water away from stack, check regularly after storms for water pooling
I once lost 50 bales to an unexpected thunderstorm because my tarp wasn’t secured properly. Wind lifted one corner, rain soaked the top layer, and mold spread through six bales before I caught it. Now I use ratchet straps—no exceptions.
What About Buying Bulk?
Pros: Significant cost savings ($2–5 per bale discount), consistent quality for entire season, reduces delivery fees
Cons: Requires substantial storage space, risk if quality issues emerge later, upfront capital commitment
My rule: Only buy 6+ months of hay if you have climate-controlled storage and you’ve tested the batch. Otherwise, buy monthly or quarterly from trusted suppliers. Learn more about hay costs.
Monitoring Stored Hay
Check weekly for: heat spots (use thermometer or hand-check deep in stack), color changes (yellowing or white patches), smell changes (musty odors developing), pest activity (rodents, birds nesting)
Any issues? Pull suspect bales immediately to prevent spread.
When to Call Your Vet (Hay-Related Warning Signs)
🚨 EMERGENCY WARNING SIGNS
Contact your veterinarian immediately if you notice:
- No manure in 12+ hours or hard, dry manure with straining
- Colic signs (pawing, looking at flanks, rolling)
- Persistent cough or labored breathing while eating
- Reluctance to move or “lami walk” after hay change
- Heat in hooves or bounding digital pulses
- Sudden weight loss despite adequate hay
Pro tip: When calling your vet about hay-related issues, have this information ready: hay type and cutting, supplier and purchase date, any recent changes in hay source, storage conditions, photos of the hay and horse. This speeds diagnosis significantly.

Frequently Asked Questions About How to Choose Hay for Your Horse
How much hay should I feed my horse daily?
Most horses need 1.5–2% of their body weight in forage per day (dry matter basis). For a 1,000-lb horse, that’s 15–20 pounds of hay. Adjust based on workload, pasture access, and body condition—always provide free-choice hay to support gut health unless managing obesity or metabolic issues.
Is second-cutting hay always the best?
Not necessarily. Second cutting is often leafier and more nutritious, but the “best” depends on your horse. Easy keepers or insulin-resistant horses may do better on coarser, lower-calorie first cutting, while performance horses or growing foals benefit from richer second or third cuttings. Quality (leafiness, smell, lack of mold) matters more than the cutting number.
Can I feed alfalfa to an insulin-resistant horse?
Generally, no—or only in small amounts. Alfalfa is higher in calories and can have variable non-structural carbohydrates (NSC). Most IR or laminitic horses do better on tested low-NSC grass hay (<10–12% ESC + starch). Always consult your vet and test hay first.
How long should I soak hay to reduce sugar?
Soak in cold water for 60 minutes or hot water for 30 minutes to reduce water-soluble sugars by up to 30%. Drain completely and feed immediately to prevent mold. Soaking is especially helpful for insulin-resistant or laminitic horses when low-NSC hay isn’t available.
My horse won’t eat soaked hay—what can I do?
Try gradually introducing soaked hay mixed with dry, or switch to tested low-NSC dry hay instead. Some horses adapt quickly; others prefer dry hay steamed (using a hay steamer) to reduce respirable dust without altering palatability as much as soaking.
Do I really need to test my hay?
Yes, especially for metabolic, senior, or performance horses. Visual inspection can’t reveal exact nutrient or sugar levels, which vary widely even in similar-looking bales. A basic test costs $30–60 and can prevent colic, weight issues, or laminitis flare-ups. Labs like Equi-Analytical offer equine-specific profiles.
How should I store hay to keep it fresh?
Store in a dry, well-ventilated area off the ground (on pallets), covered from rain but allowing airflow. Avoid direct ground contact to prevent moisture wicking and mold. Good storage can preserve quality for 1–2 years.
Is Teff hay safe for all horses?
Teff is often low in NSC and highly palatable, making it excellent for insulin-resistant horses. However, always test it—levels can vary by region and cutting. It’s not as widely available as timothy or bermuda but is gaining popularity in warmer climates.
How do I transition to new hay?
Mix old and new hay over 7–10 days, gradually increasing the new hay percentage. Abrupt changes cause digestive upset. Start with 25% new hay, increase to 50% after 3 days, 75% after 6 days, then 100% by day 10.
Conclusion
Choosing the right hay comes down to three things: your horse’s individual needs, hay quality (color, smell, leafiness, cleanliness), and—when necessary—lab-tested nutrient levels.
Whether you’re feeding a high-performance athlete, a growing foal, an easy keeper, or a senior horse, the five tips in this guide—mastering hands-on inspection, understanding cuttings, matching hay to horse type, knowing when to test, and storing properly—cover what most horse owners need to succeed.
Start by evaluating your current hay using the smell, visual, and touch tests. If you have specific nutritional concerns or metabolic horses, invest in testing. And always buy from suppliers who let you inspect before purchase—that transparency indicates quality.
Over three decades of horse ownership, hay has been both my biggest expense and my best investment. When I get it right, horses thrive. When I cut corners, I pay later—usually in vet bills or wasted hay. Use this guide to make better choices from day one.
About Miles Henry
Racehorse Owner & Author | 30+ Years in Thoroughbred Racing
Miles Henry (legal name: William Bradley) is a professional horseman based in Folsom, Louisiana. He holds Louisiana Racing License #67012 and has spent over three decades managing Thoroughbreds at premier tracks including Fair Grounds, Delta Downs, and Evangeline Downs.
Expertise & Hands-On Experience: Beyond the track, Miles has decades of experience in specialized equine care, covering everything from hoof health and nutrition to training protocols for Quarter Horses, Friesians, and Paints. Every guide on Horse Racing Sense is rooted in this “boots-on-the-ground” perspective.
30 of their last 90 starts
Equibase Profile.
Connect with Miles: