Last updated: February 2, 2026
Any links on this page that lead to products on Amazon are affiliate links and I earn a commission if you make a purchase. Thanks in advance – I really appreciate it!
I’ve been around horses my whole life, including over 30 years owning and racing Thoroughbreds at Fair Grounds and Delta Downs in Louisiana. I’ve seen what happens when hoof care gets skipped. A horse that comes up lame from a packed hoof abscess isn’t just uncomfortable; he’s out of training for weeks.
Here’s what most people don’t realize: cleaning horse hooves isn’t a chore, it’s a conversation with a 1,200-pound animal. You’ve probably heard the old saying, “No hoof, no horse.” Well, out at the track, that isn’t just a saying, it’s a law.
This guide walks you through a safe, step-by-step process based on what I’ve learned in the barn. We’ll cover tools, red flags, and mistakes to avoid. No fluff, just practical tips to keep your horse sound.

Table of Contents
Why Daily Cleaning Saves You Vet Bills
One morning at Fair Grounds, I had a promising two-year-old come out of the stall just a hair “off.” I picked up his near-fore hoof, and buried deep in the collateral groove was a jagged piece of gravel the size of a marble. If I hadn’t caught that before his morning gallop, that pressure would have turned into a deep abscess within 48 hours. We would have scratched him from the race, lost weeks of training, and dealt with a painful recovery.
That’s exactly how abscesses start, small debris, constant pressure, and trapped moisture. Daily hoof cleaning breaks that cycle. It also lets you catch loose shoes, cracks, and stone bruises before they turn into full-blown problems.
More importantly, hoof picking isn’t just cleaning, it’s inspection. You’re checking for heat, feeling for swelling, watching hoof wall integrity, and catching thrush early while it’s still easy to manage. That 60–90 second habit can save you weeks of downtime.
In the real world, daily horse hoof cleaning is one of the biggest factors in preventing costly hoof problems like thrush, white line disease, and abscesses. That’s not theory—that’s what I’ve seen happen over and over when hoof picking becomes non-negotiable.
For more on preventing abscesses and managing thrush, see my complete guide on hoof maintenance.
Tools You Actually Need
Don’t get fancy here. You don’t need a motorized scrubber or a fancy grooming kit. You need tools that work when they’re covered in mud and manure.
- A quality hoof pick – Spend a few dollars on a sturdy one with a comfortable, rubberized grip. Cheap picks bend and frustrate you. I use a Huff Pick (affiliate: check Amazon), but any pick with a curved end and good ergonomics will do. The basic metal hook design works fine. I prefer ones with a brush on the opposite end for final cleanup.
- A stiff hoof brush – After you’ve picked the debris, the brush sweeps away the remaining dirt and lets you see the hoof clearly. An old dandy brush works perfectly.
- Good lighting – Whether it’s daylight, a barn lamp, or a headlamp, you need to see what you’re doing. Thrush and cracks hide in shadows. Early morning barn work means I’m often picking hooves in dim light, so a headlamp is worth its weight in gold.
- A bucket of water – For rinsing hands and cleaning the pick between hooves (prevents spreading infection).
- Thrush treatment – Keep a bottle of thrush remedy on hand. I’ve used both commercial products and diluted iodine solutions successfully. Only apply when you actually see signs of infection.
- Hoof conditioner (optional, seasonal) – In DRY conditions, yes—conditioner prevents cracking. In WET conditions, skip it—you risk trapping moisture and inviting thrush. Ask your farrier about your specific climate.
Affiliate note: The basic hoof pick with brush combo I recommend runs about $8 and lasts a good while. I earn a small commission if you purchase through that link, at no extra cost to you.
Miles’ TakeThe 5-Second Safety Check
Step-by-Step: How to Clean a Horse Hoof Safely
Here’s the proven sequence I’ve used on hundreds of horses. Follow it exactly, and you’ll finish safely and thoroughly. These steps work for green horses and seasoned veterans alike.
Step 1: Approach and Read Body Language
What to do: Stand at your horse’s shoulder, facing toward the rear of the horse. Speak calmly. Watch your horse’s ears. If they’re pinned back, tail swishing, or the horse is shifting weight nervously, wait. A tense horse is more likely to pull away or strike. I always keep my “inside” hand on the horse’s shoulder so I can feel if they’re about to shift their weight toward me.
Why it matters: You’re about to pick up a 1,200-pound animal’s foot. If he’s anxious, you’ll both be frustrated. Two minutes of calm talk is cheaper than a trip to the ER. A relaxed horse gives his foot willingly. An anxious horse fights you every step. Never corner a horse or approach aggressively—especially never walk straight up behind them and reach for a hind leg without warning.
Step 2: Proper Leg Lift Technique
What to do: Run your hand gently down the back of the front leg (or front of the hind leg). Place your hand on the chestnut (that rough spot above the fetlock) or press gently on the tendons just above the fetlock with your thumb and fingers.
How to ask for the foot: Say a clear command—”Foot,” “Lift,” “Give,” or whatever cue you use. At the same time, apply steady pressure to the tendons. Lean your shoulder against the horse’s shoulder (for front legs) to shift his weight. Most horses respond within a few seconds.
If he doesn’t lift: Don’t get aggressive. Increase pressure gradually. Apply your shoulder more firmly. Repeat the voice command. Patience wins. A horse that’s been bullied will plant his feet even harder next time.
Step 3: Safe Positioning (Three Angles Matter)
Once the horse offers his foot, you have three positioning options. Pick the one that feels safest for you:
Option 1: Sitting between the legs (most stable) – Sit on a low stool, placing the hoof on your lap or between your thighs. This is the safest position if the horse pulls back—you can release the foot easily, and you’re low and out of striking range.
Option 2: Standing with the hoof braced on your thigh – Stand perpendicular to the horse, rest his hoof on your thigh (about knee height). Brace your leg firmly. For front feet, squat or kneel beside the leg, not in front of it. For hind feet, stand to the side, close to the horse’s body. This position works for horses who hate being crowded.
Option 3: Using a hoof stand or jack – For horses that are hard to hold or for people with knee issues, a hoof stand frees both your hands.
Critical positioning rule: Always be able to release the foot in one second if the horse pulls. Never wrap the leg. Never restrain so tightly that the horse feels trapped. If the horse is fidgety or hard to hold, that’s a sign to use a hoof stand instead of wrestling. Don’t get into a wrestling match you’ll lose—you will lose.
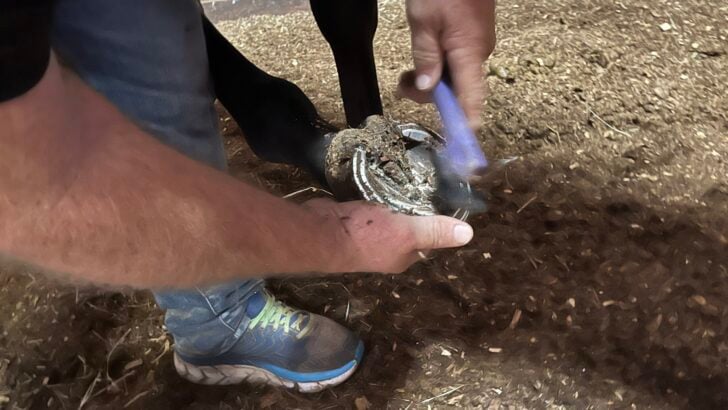
Step 4: Heel-to-Toe Cleaning Direction (CRITICAL SAFETY)

Why: If the pick slips or the horse jerks, the motion carries away from your body, not into your hand or leg. The pick is a lever; if it slips while you’re pulling toward yourself, it’s a weapon. One slip in the wrong direction costs you stitches.
The motion:
- Start at the heel of the hoof (the rear), on either side of the frog
- Using firm, steady pressure, scrape and pick heel-toward-toe, staying on the SIDES of the frog (never directly into the soft center of the frog)
- Work around the entire sole, removing mud, stones, and packed manure
- Continue along the inside edge of the hoof wall if the horse is shod
- Angle the pick so debris falls away from you, not onto your boots
Pressure level: Be firm. Light scratching misses debris. But don’t hammer. You’re scraping, not carving. Apply firm pressure but don’t jam the pick into the sole—you’re removing packed dirt, not excavating.
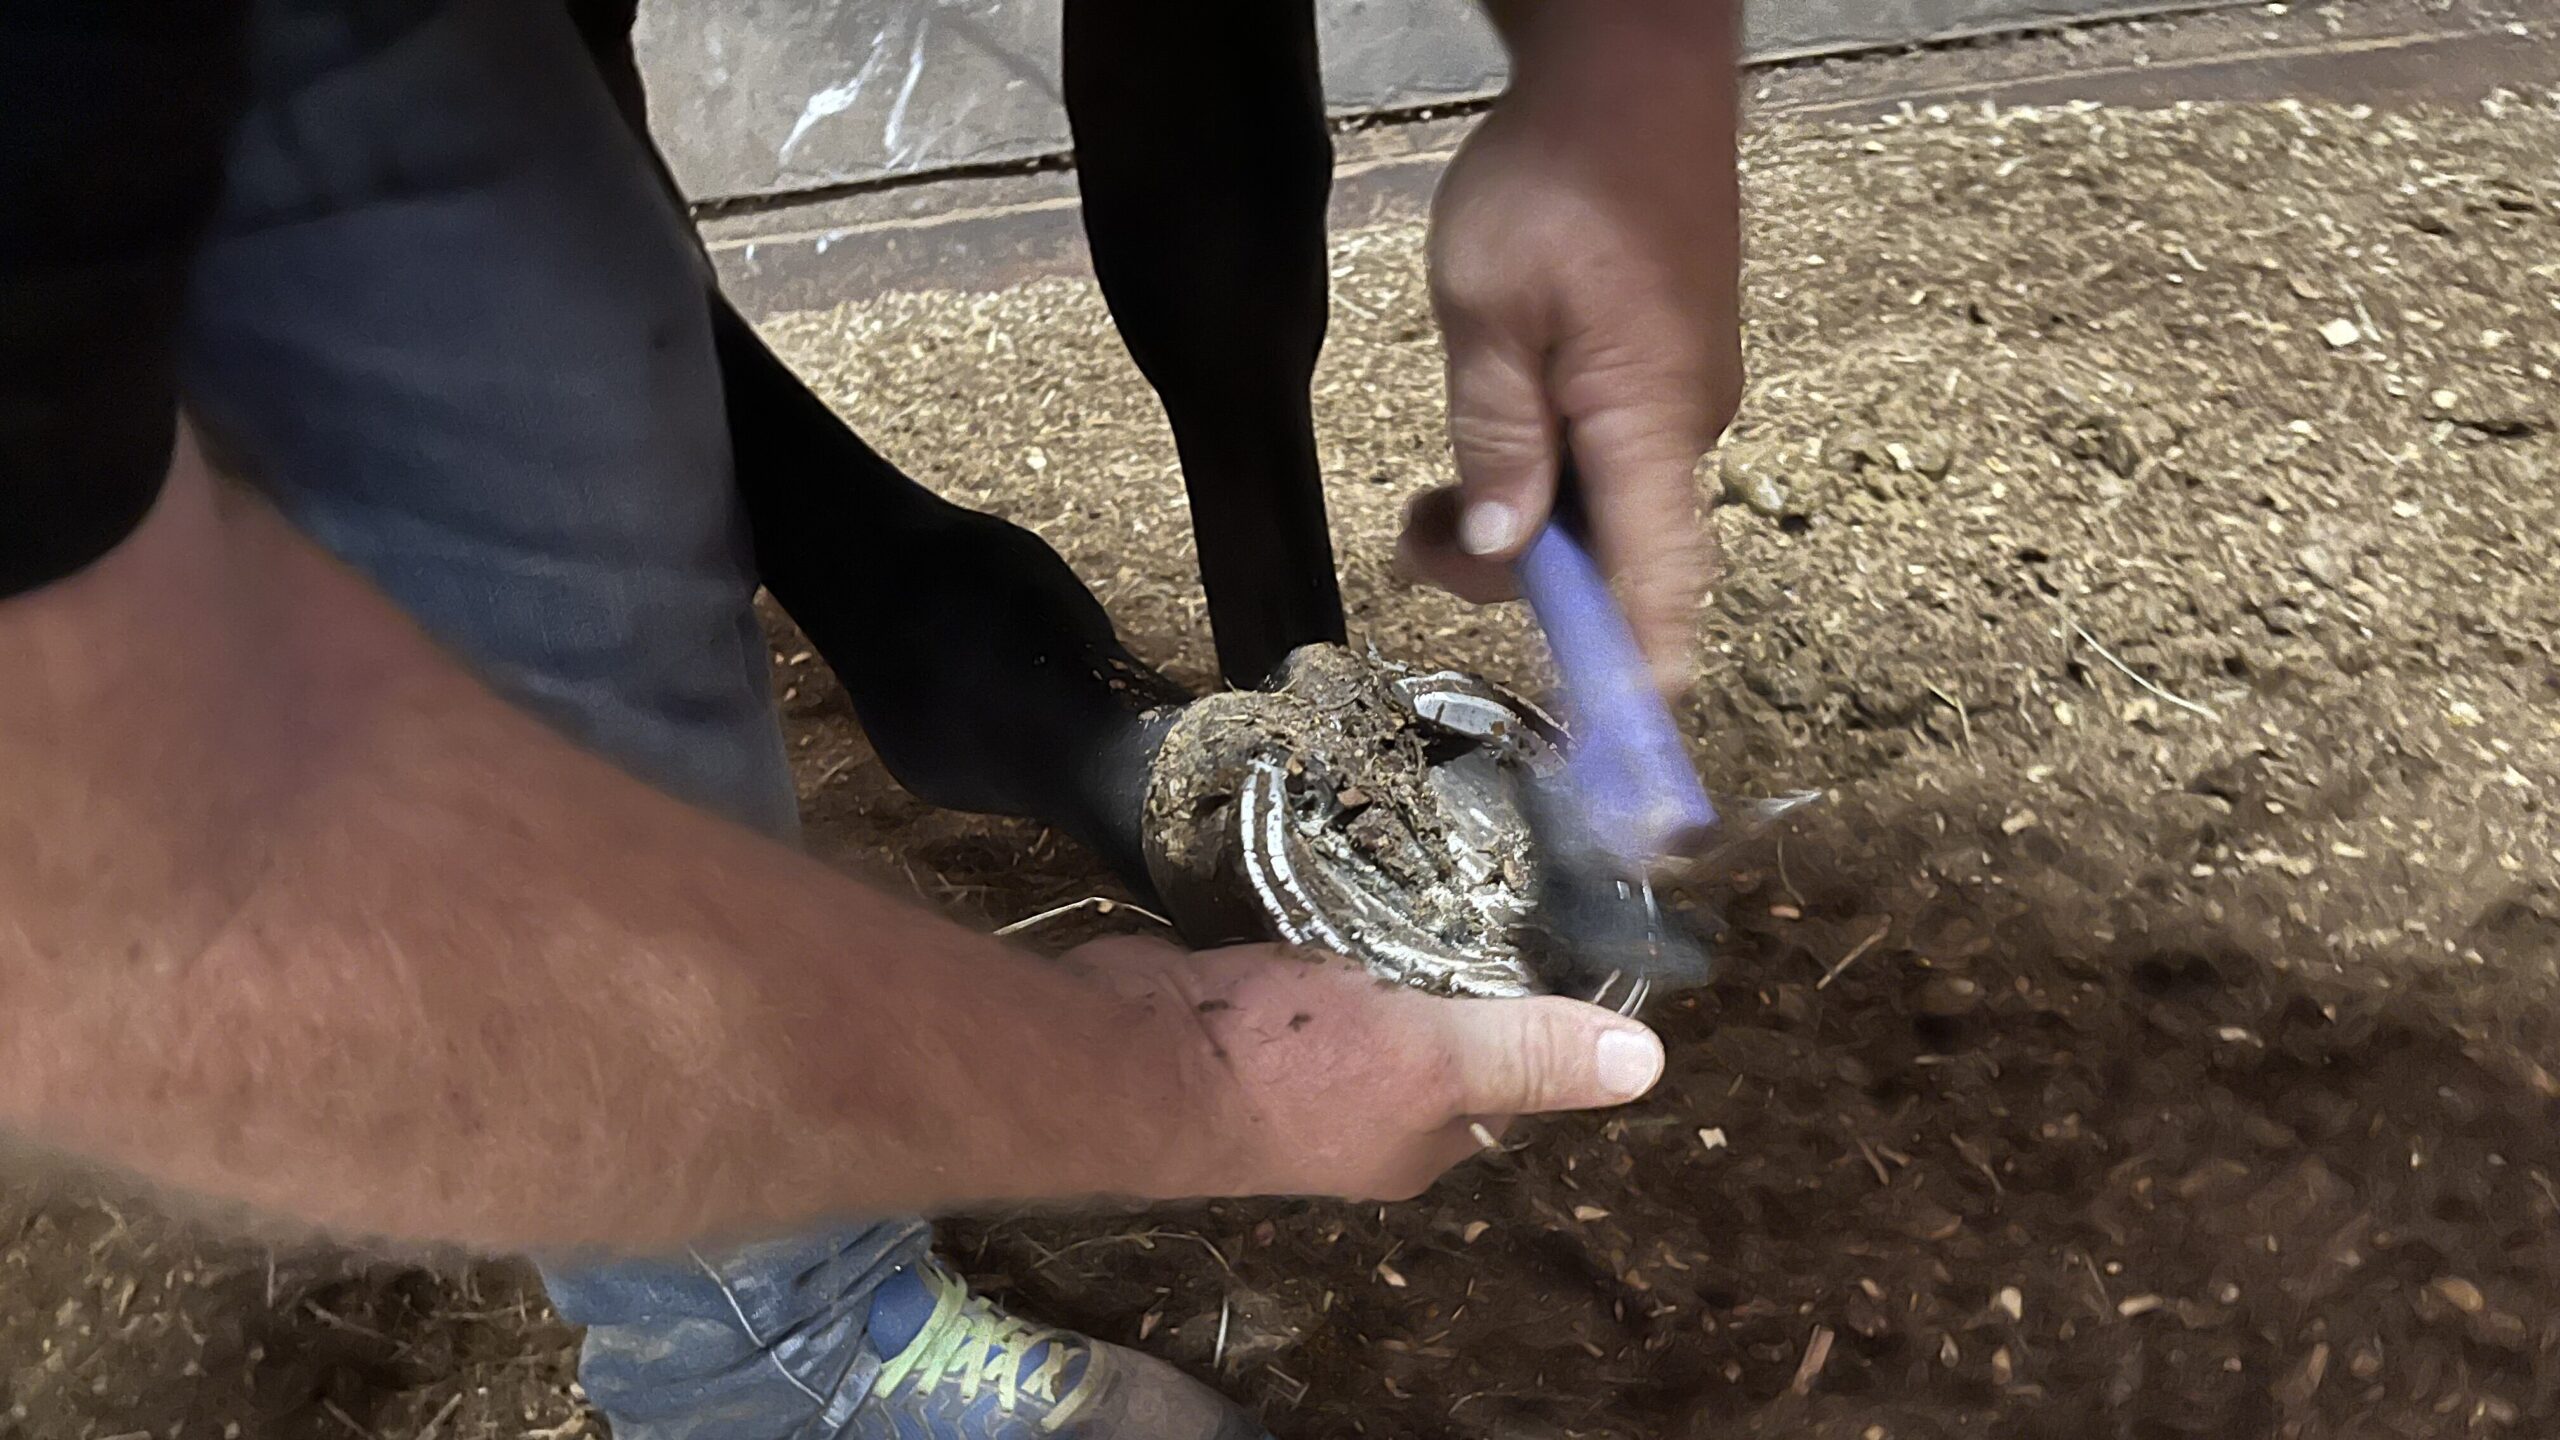
Step 5: Collateral Groove Cleaning (Thrush Prevention)
The collateral grooves are the two deep valleys that run alongside the frog—those crevices on either side where the frog meets the sole. This is where thrush LOVES to hide and where bacteria thrive.
What to do:
- Using the pointed end of your hoof pick, place it in the groove where the frog meets the sole (the line between them)
- Push firmly downward and AWAY from yourself (heel-to-toe motion)
- Work the length of both grooves, removing all black material and buildup
- You should see clean, healthy tissue—no dark, crumbly material, no foul smell
What healthy looks like: Clean frog tissue is firm, pinkish or gray, with minimal discharge. If it’s black, oozing, or smells rotten, that’s thrush developing (see FAQ for treatment). This is the #1 thrush prevention zone—spend extra time here.
I had a mare a few years back who developed thrush in both front feet after a week of heavy rain and muddy turnout. We caught it early because I was picking her feet twice daily. Cleaned them out, applied iodine solution, and moved her to a dry stall with fresh shavings. Cleared up in ten days. If I’d waited another week, we’d have been looking at a more serious infection and possible lameness.
Step 6: Sole Inspection
Once the hoof is clean, take five seconds to actually look at it. Run the flat edge of your pick gently across the sole to check for:
- Stones or foreign objects – Anything wedged in the white line area or sole. Remove anything lodged.
- Puncture wounds – Dark spots, holes, or anything that looks like penetration
- Cracks in the hoof wall – Small cracks are usually cosmetic, but deep cracks need your farrier’s attention.
- Loose shoes – Shoe inspection signs, shifted nails, separated shoe, or excessive movement,
- Abnormal sole color – Bruising shows up as red or purple discoloration
- Soft spots in the sole – Pressing on the sole should feel firm. If one area is mushy, it could be an abscess developing.
- Heat in the foot – Run your hand over the hoof wall. Compare the sole to the other feet. Does it feel warmer? Unusual warmth can indicate abscess, laminitis, or injury. Heat signals inflammation.
For more detail on what these problems look like and how to address them, see my complete hoof care guide.
Step 7: Safe Release
When you’re done, place the foot on the ground gently. Don’t just drop the hoof. Don’t rush. Guide it down gently by lowering your hand and letting the horse place their foot where they want it.
Why: A horse that’s been standing on three legs for 5–10 minutes might be sore or stiff. Releasing suddenly can startle him or cause him to stumble. This keeps you from getting stepped on and prevents the horse from learning they can jerk their foot away whenever they feel like it. This teaches the horse respect and prevents him from snatching the leg away in future sessions.
If a horse pulls their foot away mid-cleaning, let it go. Don’t try to hang on—you’ll lose that fight and possibly get dragged. Instead, start over: calm the horse, reposition yourself, and try again. Figure out why they pulled away. Are they sore? Impatient? Testing you? Address the cause.
Repeat for all four hooves, typically in this order: left front, left rear, right front, right rear (or whatever sequence your horse prefers).

What to Look For: 5 Red Flags During Cleaning
These are the warning signs that mean you need to call your vet or farrier today, not next week:
- Foul smell from the hoof (thrush indicator) – Black, foul-smelling discharge in the frog area indicates bacterial infection. Caught early, you can treat it yourself with thorough cleaning and topical treatment. If severe or not improving in 48 hours, call your farrier (see FAQ for full thrush treatment details).
- Heat in the hoof wall or coronary band – Extreme heat in the hoof or sole. Heat means inflammation. Could be an abscess brewing, early laminitis, or an old injury flaring up. One hoof noticeably warmer than the others? Compare to the opposite front or rear hoof. If it’s significantly hotter, this is an abscess risk. Call your vet within 24 hours.
- Puncture wounds or embedded objects – Visible puncture wound, nail, or wire in the hoof. If something is stuck in the sole, don’t pull it out yourself unless it’s obviously loose. A deep puncture needs veterinary care immediately, especially if it’s in the center or rear of the hoof (frog area)—risk of pedal bone or tendon damage. Leave it in place and call your vet immediately. Pulling it out can cause more damage and makes it harder to determine depth and location.
- Sudden lameness after cleaning – Lameness or pain response when you touch certain areas. If your horse flinches violently when you press the sole or frog, something hurts. If your horse was sound before you picked their feet and limping after, you either hurt them (unlikely if you followed the steps above) or uncovered an existing problem. Don’t keep cleaning that spot. Let a professional assess it. Watch them walk, then call your vet.
- Crumbling or soft hoof wall – Deep cracks in the hoof wall (running from top down). Cosmetic cracks grow out. But if a crack originates at the coronary band and travels downward, especially if it’s deep, this needs your farrier to evaluate. Deep cracks can lead to infection and permanent damage. This can indicate nutritional deficiencies, chronic thrush, or white line disease. Your farrier needs to see this and may recommend dietary changes or hoof supplements.
7 Common Mistakes (And How to Avoid Them)
- Picking Toward Yourself – The problem: Your hand is in the strike zone if the pick slips. The fix: Always pick heel-to-toe, away from your body (see Step 4 for full technique). Make it automatic. This is non-negotiable for safety.
- Skipping the Frog Grooves – The problem: You clean the sole but ignore the grooves where the frog meets the sole. That’s where thrush hides and thrives. The fix: Spend extra time in the grooves. This is the #1 thrush prevention zone. Don’t rush this step. These deep crevices trap moisture and bacteria. If you’re not cleaning them out daily, you’re inviting thrush.
- Forcing a Foot When the Horse Refuses – The problem: You wrestle for the foot, the horse gets defensive, and next time he plants even harder. You’re now in a wrestling match you’ll lose. The fix: Patience. Try again in five minutes. Sometimes a calm horse just needs a moment. If a horse consistently refuses, talk to your farrier—there might be pain (tenderness, old injury, arthritis) making him guard his feet.
- Aggressive Picking of the Frog Center – The problem: You stab aggressively into the soft center of the frog, causing pain or damage to sensitive tissue. The fix: Work the SIDES of the frog and grooves. The center frog tissue is sensitive. If there’s diseased material in the center, your farrier handles it.
- Cleaning a Horse’s Feet After Mud Without Letting Them Dry First – The problem: You drag a muddy hoof over yourself, and you can’t see the actual hoof condition under the mud. The fix: If possible, knock off excess mud or rinse and let hooves briefly drain so you can see what you’re doing. THEN pick thoroughly.
- Not Checking the Other Three Hooves for Comparison – The problem: You clean one hoof, see something that looks wrong, but you have nothing to compare it to. The fix: Always clean all four hooves. Compare each one to the opposite foot (left front to right front, left rear to right rear). Is one hotter? Smellier? More swollen? Comparison tells you if something’s abnormal.
- Missing Early Signs of Abscess (Warmth, Sensitivity) – The problem: You feel slight heat or the horse flinches slightly, but you chalk it up to nothing. Within 48 hours, he’s lame and painful. The fix: Document what you feel. Take a photo of the hoof. Check it again in 12 hours. If heat or sensitivity increases, or if lameness appears, call your vet. Early abscess treatment (poulticing, soaking, farrier care) prevents weeks of downtime.
How Often Should You Clean Hooves?
Twice daily is ideal: before and after riding.
Morning cleaning removes whatever accumulated overnight—manure, wet bedding, mud from turnout. Evening cleaning (or post-ride cleaning) gets rid of arena dirt, trail debris, or whatever they picked up during work.
If you can only clean once per day, do it in the evening after turnout or work when debris is most likely to be packed in there. But once per day is the bare minimum—twice is what keeps hooves genuinely healthy.
For horses in regular work or racing: Twice daily—morning and evening. This is the standard for any horse in training or competition. Our racehorses get their feet picked three times daily: morning barn routine, post-training, and evening check. That might seem excessive, but these horses work hard on dirt tracks, and a stone bruise can sideline a horse for weeks. The extra two minutes per horse is cheap insurance.
For horses on pasture or light use: Once daily is acceptable, but twice is still ideal. Particularly after wet weather or muddy turnout.
For horses in wet, muddy conditions or those prone to thrush, I’ll pick feet even more frequently—sometimes four times a day until conditions improve. It sounds obsessive, but thrush can take hold in 48 hours, and treating it costs more time and money than preventing it.
Below is a YouTube video showing how to clean out a horse hoof.

Frequently Asked Questions About How to Clean Horse Hooves
Does cleaning a horse’s hoof hurt them?
No. There are no nerve endings in the outer hoof wall or sole. Cleaning doesn’t cause pain—it’s like trimming nails or brushing. In fact, most horses feel relief when you remove pressure and debris from their feet. If your horse reacts painfully to cleaning, that’s a red flag—something hurts, and you need to investigate (abscess, bruise, puncture wound, etc.). The live sole underneath has nerve endings, and your horse will let you know if you’re hurting them by pulling their foot away or flinching.
How long does it take to clean all four hooves?
For experienced handlers, 5–10 minutes total. For beginners, 15–20 minutes. Once you develop the routine habit, you can do it fast without rushing. Speed comes from rhythm and confidence, not pressure.
My horse won’t let me pick up their hind feet. What should I do?
Start with short sessions and build tolerance gradually. Teach your horse to yield to pressure by running your hand down their leg and rewarding any attempt to lift the foot. Build duration slowly. If your horse is kicking, striking, or refusing completely, get a trainer involved—this is a safety issue. Also consult your farrier or vet, as pain may be the cause. Standing for hoof care is a basic, life-saving skill.
What’s the difference between thrush and an abscess?
Thrush is a surface bacterial infection of the frog. Signs include foul smell, black slimy discharge, and spongy tissue in the collateral grooves. Horses may be sound or slightly tender. Treatment includes daily cleaning, antifungal or antibacterial solutions, and keeping the hoof dry. Abscesses are deep infections inside the hoof and cause sudden, severe lameness, heat, and extreme sensitivity. Abscesses require professional drainage and veterinary or farrier care. Thrush is usually manageable early; abscesses are an emergency.
Can I clean hooves on wet or muddy days, or should I wait until they dry?
Clean them even if they’re muddy—especially if they’re muddy. Wet conditions are when thrush and bacterial infections thrive. Leaving packed mud against the frog creates the perfect environment for infection. Use water and a stiff brush if needed, then dry the hoof as best you can.
What should I do if I find a stone bruise or puncture wound?
For a stone bruise, keep the hoof clean and dry, monitor for heat, and watch for lameness. If lameness develops within 24–48 hours, contact your vet. For puncture wounds, remove loose objects if safe and mark the location. If the wound is in the frog or rear of the hoof, contact your vet immediately due to risk of deep infection.
Should I use hoof conditioner or oil after cleaning?
It depends on climate and hoof quality. In dry climates, conditioners can help prevent cracking. In wet climates, excess moisture is usually the issue, and conditioners may not be needed. Follow your farrier’s recommendation based on your horse’s hooves and local conditions.

Master Your Horse’s Hoof Health
Hoof cleaning is the foundation of equine soundness. Master it, make it routine, and you’ll catch 90% of problems before they become expensive emergencies.
Cleaning hooves doesn’t have to be complicated. It just has to be consistent. The horses in my barn get their feet picked every single day, no exceptions, because I’ve seen what happens when you skip it—abscesses, thrush, puncture wounds that could’ve been caught early.
The process I’ve outlined here is the same one I’ve used for thirty years, from backyard Quarter Horses to stakes-winning Thoroughbreds. It works because it prioritizes safety first, thoroughness second, and speed last. Master the technique, make it a habit, and your horse’s hooves will thank you.
Ready to go deeper into hoof health? Read our complete guide on Horse Hoof Care: Anatomy, Problems, and Maintenance Tips for information on hoof anatomy, thrush treatment, laminitis prevention, advanced therapeutic shoeing, and seasonal care strategies.
Want practical racing and horse care tips delivered weekly? Sign up for our newsletter to receive updates on soundness, conditioning, nutrition, and real-world lessons from 30+ years in the barn. Get access to our free PDF Hoof Health Checklist. [Email signup form]
Share your experience: Have a hoof care story or a trick that’s worked for your horse? Drop a comment below. Let’s build a community of horse owners who keep their horses sound and thriving together.
About Miles Henry
Racehorse Owner & Author | 30+ Years in Thoroughbred Racing
Miles Henry (legal name: William Bradley) is a professional horseman based in Folsom, Louisiana. He holds Louisiana Racing License #67012 and has spent over three decades managing Thoroughbreds at premier tracks including Fair Grounds, Delta Downs, and Evangeline Downs.
Expertise & Hands-On Experience: Beyond the track, Miles has decades of experience in specialized equine care, covering everything from hoof health and nutrition to training protocols for Quarter Horses, Friesians, and Paints. Every guide on Horse Racing Sense is rooted in this “boots-on-the-ground” perspective.
30 of their last 90 starts
Equibase Profile.
Connect with Miles: